There’s nothing quite like watching a blockbuster film, a live footy match, or your favourite series on a properly set up home theatre system. But getting there, choosing the right gear, positioning it correctly, and connecting everything so it actually works, is where most people get stuck.
This beginner’s guide to home theatre installation covers every stage of the process clearly and practically, from choosing the right room through to final calibration. Whether you’re planning a full DIY setup or thinking about bringing in a professional, this guide gives you a solid foundation to work from.
Step 1: Choose the Right Room
The room you choose has more impact on your home theatre installation result than almost any piece of equipment. A large screen and quality speakers in the wrong room will still disappoint.
What makes a good home theatre room:
- Enough space for speakers around the seating area without feeling cramped
- Limited natural light, or windows that can be covered easily
- Reasonable sound isolation from the rest of the house
- Walls and floor that can support speaker stands and a wall-mounted screen
- Access to power outlets in the right locations
Rooms with hard parallel walls and no soft furnishings create echo and reverb that muddies dialogue and undermines surround sound. A room with carpet, curtains, and upholstered furniture naturally absorbs sound and gives you a better starting acoustic environment.
Step 2: Pick Your Screen
The display is the centrepiece of any home theatre installation, and the choice between a large flat-panel TV and a projector system comes down to your room, your budget, and how you use the space.
Large flat-panel TV (65 to 85 inches)
The most practical choice for most Sunshine Coast living rooms. Modern OLED and QLED panels deliver exceptional picture quality, and installation is straightforward. QLED panels are better suited to rooms with significant natural light. OLED panels shine in darker rooms where their contrast advantage is most visible.
Projector and screen
For a genuine cinema-scale experience, a projector with a 100-inch or larger screen delivers something a flat panel can’t match. Ultra-short throw projectors have made this practical for ordinary living rooms, sitting just centimetres from the screen rather than requiring ceiling mounting across the room. The trade-off is higher cost and the need for more controlled lighting.
Viewing distance matters as much as screen size. For a 4K panel, the ideal seating distance is roughly 1 to 1.5 times the screen’s diagonal measurement in centimetres. Getting this right is part of what our smart TV setup service on the Sunshine Coast covers during every professional installation.
Step 3: Plan Your Sound System
Audio is where most beginners underinvest relative to the difference it makes. A mid-range surround sound system in a well-configured room consistently outperforms an expensive soundbar in an untreated space.
5.1 surround sound remains the most popular configuration for home theatre installation in standard living rooms:
- Front left and right speakers at ear level, angled toward the seating position
- Centre speaker directly below or above the screen for clear dialogue
- Two surround speakers to the side and slightly behind the main seating position
- Subwoofer near the front of the room for bass distribution
Soundbar options
For rooms where running speaker cables isn’t practical, a quality Dolby Atmos soundbar delivers a convincingly immersive experience. Premium models with physical upward-firing drivers produce height channel audio that adds real depth to the soundstage.
Regardless of which system you choose, speaker placement determines how much of the system’s capability you actually hear. Getting the cables, sound, and screen positioning right from the start makes a bigger difference than most people expect.
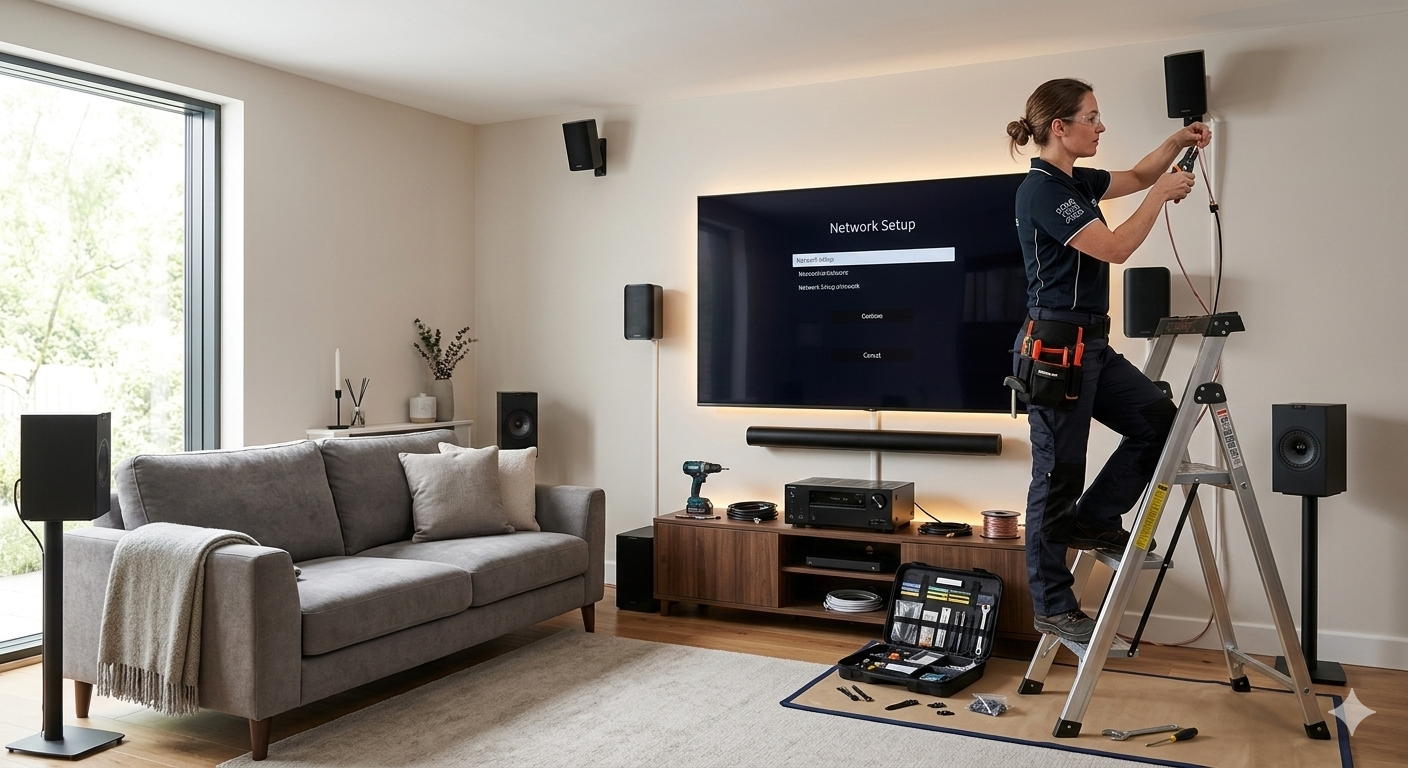
Step 4: The AV Receiver
For a full surround sound home theatre installation, the AV receiver is the control centre that manages every audio and video source in the system. It connects your TV, speakers, streaming devices, gaming consoles, and Blu-ray player, processes the audio, and distributes it to the correct speakers at the right levels.
When selecting a receiver, prioritise:
- HDMI 2.1 inputs for 4K HDR and high-frame-rate gaming support
- Dolby Atmos and DTS:X decoding for immersive audio
- Automatic room calibration tools, Audyssey, YPAO, or MCACC, which measure your room acoustics and adjust speaker levels automatically
- Enough channel amplification for your speaker configuration
The AV receiver is the component that ties every element of a home cinema system together, and its quality and configuration directly determines the system’s ceiling performance.
Step 5: Wall Mounting and Cable Management
A home theatre installation that looks as good as it sounds requires proper mounting and cable management. A beautifully set up system undermined by cables trailing across the floor and a TV at the wrong height is a frustrating outcome.
TV mounting considerations:
- Screen centre should align with seated eye level, not arbitrary height
- Wall type determines mounting hardware, plasterboard requires stud anchoring, masonry requires masonry fixings
- In-wall cable management delivers the cleanest finish and is significantly easier to achieve during installation than as a retrofit
Cable management options range from surface-mounted cable channels, suitable for renters or where in-wall routing isn’t practical, through to full in-wall concealment that leaves nothing visible between the screen and the power outlet.
For Sunshine Coast households concerned about this specifically, CHOICE’s television buying and setup guide covers cable management and mounting considerations alongside screen selection in detail.
Step 6: Internet and Streaming Connectivity
Most modern home theatre installation setups rely heavily on streaming. A smart TV or streaming device connected to a poor Wi-Fi signal produces buffering, resolution drops, and audio sync issues that undermine the whole experience.
Best practice for streaming performance:
- Connect your smart TV or streaming device via Ethernet cable rather than Wi-Fi wherever possible
- If Wi-Fi is the only option, ensure the router is positioned to provide strong signal to the viewing room
- For larger Sunshine Coast homes where the router is far from the home theatre area, a mesh Wi-Fi node in the viewing room resolves most streaming reliability issues
Step 7: Final Calibration
No home theatre installation is complete without calibration. Most AV receivers include automatic speaker calibration tools that measure your room’s acoustic characteristics and adjust delay, level, and equalisation for every speaker. Running this process takes around fifteen minutes and typically delivers a more balanced result than manual adjustment.
Final calibration checklist:
- Run automatic speaker calibration with the microphone at your primary seating position
- Set subwoofer crossover frequency correctly for your main speakers, typically 80 to 120 Hz
- Adjust TV picture settings, most TVs default to overly bright, vivid picture modes that aren’t ideal for home theatre viewing
- Test every input and audio format before considering the installation complete
Why Professional Home Theatre Installation Gets Better Results
Every stage of a home theatre installation benefits from experience, accurate equipment, and knowing what to look for before the first cable is connected. Professional installation means no compromised speaker positions, no screen mounted at the wrong height, and no streaming that buffers because the network wasn’t considered.
See what other Sunshine Coast locals think of our work by checking out what our customers say before you book.
Explore our full range of TV mounting, antenna, WiFi, and home theatre services at Brocky’s TV.
Book Your Home Theatre Installation Today
Ready to turn your living room into something genuinely impressive? Call us on 1800 588 688 or 07 54 511 886, Monday to Friday during business hours.
Contact us today to book your home theatre installation consultation or get a no-obligation quote across the Sunshine Coast.
FAQs
1. How long does a home theatre installation take?
Most residential installations are completed in two to four hours. Larger systems involving in-wall cabling, complex speaker runs, or multi-room audio may take longer, and we’ll confirm the timeframe before starting.
2. What’s the minimum room size for a home theatre setup?
There’s no strict minimum, but a room that allows at least 2.5 metres between the screen and the main seating position works well for a 65-inch TV. Larger screens need proportionally more distance for comfortable viewing.
3. Do I need a separate AV receiver or will a soundbar do?
A quality Dolby Atmos soundbar delivers excellent results for most households. A separate AV receiver with individual speakers delivers more immersive surround sound, particularly in larger dedicated rooms. The right choice depends on your room, budget, and how critical audio quality is to you.
4. Can cables be hidden during a home theatre installation?
Yes. In-wall cable concealment is the cleanest option and is significantly more straightforward during installation than as a retrofit. Surface cable channels are a practical alternative for renters or situations where wall penetration isn’t possible.
5. What’s the best TV size for a home theatre in a typical Sunshine Coast living room?
For most living rooms with seating at 2.5 to 3.5 metres, a 65 to 75 inch 4K TV delivers an excellent result. Larger screens work well at greater viewing distances or with projector setups.